I just replaced my Dremel 6300 Multi-Max oscillating saw, which failed horribly after about an hour of runtime over several small projects. Home Depot was good enough to take it back (within the warranty period) and not make me deal with Dremel as directed on the warranty form. I took the credit and traded up to the Bosch MX25E. It's much heavier than the Dremel, which I take as a good sign. The tool was made in Malaysia, the blades were made in Europe, and the storage bag was made in China.
It came with several blades (what you get will depend on exactly which specific kit you buy) and an adapter plate that's supposed to let you use accessories from other manufacturers. The adapter plate just presents a bunch of hard, somewhat sharp points to a non-bosch blade, so you should be able to use it with anything that fits over the mounting screw regardless of the pattern of studs it was designed for. Unfortunately, you do have to completely remove the screw to change blades. Even the Dremel had a slightly faster option.
It also came with a nice box to organize accessory blades in, and I prefer the heavy cloth storage bag over an inflexible plastic clamshell case.
I used it last weekend to cut the lath in the ceiling of our upstairs bathroom for a new ventilation fan. So far, so good. If you work with lath and plaster construction, these oscillating saws are great. Score and chip off the plaster with a knife, and cut the exposed lath with the saw. The high-speed oscillating action doesn't vibrate everything and damage the adjoining plaster like a sawzall or hand saw. It's house surgery with one of these things.
Monday, June 25, 2012
Bosch Rotary Hammer Angle Head Review
This here is a little writeup of the Bosch 1618580000 Angle Head for their line of rotary hammers. I bought one of these not too long ago, but had no luck even finding a decent photo of one on the web before I gave up and ordered it. Bottom line: it's solid. Made in Germany no screwing around solid piece of Bosch equipment. The body is some sort of reinforced resin casting, and what I can see of the guts is crisply-machined metal.
After removing the front handle, it slips right over the head of your Bosch rotohammer and a shaft inside engages with the chuck like a bit, except that doesn't lock in. You tighten a hex bolt to clamp it onto the body of the drill, and it can be rotated to any angle to help you reach in tight spots.
There are some caveats, one huge and the others worth knowing about. The big one is it doesn't fit all of their rotohammers. I wound up having to go buy a whole new drill to get my job done! The verbage is confusing, so either check your model number against the list of drills it says it fits, or measure the diameter of the collar behind the chuck. The inside diameter of the angle head is 42mm. My "Bulldog Xtreme" (model 11255VSR) is 50mm... So now I have two rotohammers, which makes me a tool badass, but I think I'd rather just have the extra money I had to spend.
Another issue is runtime. After ten minutes or so of continuous use, the head will get hot and you have to let it cool down. It also reduces the impact action, so don't expect to go as fast as you can with the drill itself. I think it took me about 30 minutes to drill a 5/8" diameter hole 13" deep in decent concrete, including breaks to let the head cool down.
So there you go.
 |
| Bosch Angle Head |
After removing the front handle, it slips right over the head of your Bosch rotohammer and a shaft inside engages with the chuck like a bit, except that doesn't lock in. You tighten a hex bolt to clamp it onto the body of the drill, and it can be rotated to any angle to help you reach in tight spots.
 |
| Angle Head Attached to My Rotary Hammer |
There are some caveats, one huge and the others worth knowing about. The big one is it doesn't fit all of their rotohammers. I wound up having to go buy a whole new drill to get my job done! The verbage is confusing, so either check your model number against the list of drills it says it fits, or measure the diameter of the collar behind the chuck. The inside diameter of the angle head is 42mm. My "Bulldog Xtreme" (model 11255VSR) is 50mm... So now I have two rotohammers, which makes me a tool badass, but I think I'd rather just have the extra money I had to spend.
Another issue is runtime. After ten minutes or so of continuous use, the head will get hot and you have to let it cool down. It also reduces the impact action, so don't expect to go as fast as you can with the drill itself. I think it took me about 30 minutes to drill a 5/8" diameter hole 13" deep in decent concrete, including breaks to let the head cool down.
So there you go.


Friday, June 22, 2012
Installing Euro Mudguards on a 2012 Prius
We finally got a new car. A 2012 Prius 3. Three tanks of gas in, and it's getting right about 51 mpg overall. As long as gas stays above about $3.25 a gallon, my math says it will pay for itself vs. reasonable alternative cars.
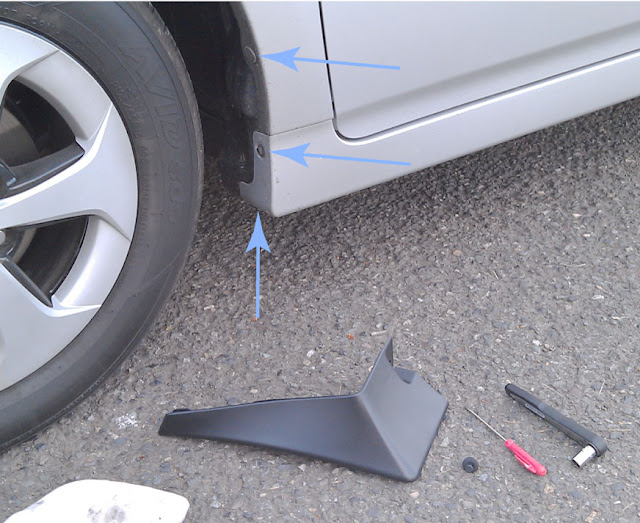

I've always put mudflaps / guards on my cars. They don't keep the dirt off, but they do reduce the amount of rock chips and tar that winds up on the side of the car. There are two styles of guards available from Toyota. The ones for the U.S. market are smallish, for some reason, but there are folks on the internet importing and selling the European version, which look much more like normal mudflaps to me. I got a set from www.juicedhybrid.com, mainly because I found a 10% off coupon code on a forum. A lot of people seem to be concerned with how difficult it will be to install these mudflaps, and what they will look like, so here's my experience. They were very easy to install, and... they look like mudflaps!
Here's a before shot of the front, with the existing fastener points indicated. VERY easy. I used a small flathead screwdriver, and a 10mm socket on a small 1/4" drive wrench. The screwdriver is used to pop up the center of the little plastic connector, and the socket undoes a couple of screws, which are re-used to attach the mudguard. The mudguards come with a new, longer plastic connector to fasten in the top hole, and that's it.

The rear is slightly more of a pain. I did it without taking the rear tire off, by using a really stubby screwdriver bit holder. If you jack up the car and pull off the tire, this job is trivially easy, and you can use regular screwdrivers and a drill to make your holes if you're more comfortable. The tools shown are a couple of stubby #2 phillips screwdrivers and a homemade tool called a birdcage awl. It's just a nail, set into a wooden handle and sharpened to a square point with a file. I use it for scratching marks, and the corners on the square point will cut a quick pilot hole in wood or plastic if the tool is twisted.

Hold the mudflap up against the car and carefully make sure it's located properly. Use the awl to reach through the lower mounting hole and scratch a horizontal line through the paint on the plastic fender / bumper. Slide one of the little metal screw clip thingies onto the plastic fender at your mark, and make a pilot hole in the center with the awl or whatever you're using.
 |
| With a short awl and really stubby screwdriver, you don't need to take the rear wheel off. |
Put the guard in place, drive a screw into the lower hole, and then locate and mark the upper hole in the same way. I know this seems fiddly, and doing them both at the same time would be faster, but this way you know everything will line up. Finally, drive the third screw in from the bottom of the guard, into the underside of the bumper. Now go find a rally course and try to spit some gravel at a Subaru.
Thursday, May 31, 2012
Water Heater Efficiency - or My Rant Against Tankless
Tankless on-demand water heaters are in vogue right now, along with most other things that purport to save money on energy costs. I think they're a silly waste of money for most people, especially folks who are trying to improve the energy efficiency of their older home. May I blather at you? It's the internet, right?
I'm a fan of a basic electric water heater. No moving parts means not much to go wrong, there's no risk of carbon monoxide poisoning, they're easy to install, and cheap. They're also nearly 100% efficient. All the electrical energy consumed goes right into heating the water. If the tank is well-insulated, the losses to the air around the water heater are small. They're especially small if the tank lives inside the thermal envelope of your home, since the heat flow is a function of the difference in temperature across the insulation. And if you live in a heating climate, the heat lost just keeps your home warmer and reduces the load on your heating system by some tiny amount during most of the year. For many people in older houses, the water heater lives in the basement, and this situation applies.
So why would you want a tankless? Natural gas is cheap... For now. I'm not sure that's a good long-term gamble. Big families that need a lot of hot water in a short period of time might want a tankless. The most compelling argument for me is the essentially unlimited flow of hot water you can get out of on-demand units. But I view this as a luxury upgrade, not an energy saver.
What happens if the power goes out? A tank heater will stay hot for a very long time, and you can use the hot water in it as long as gravity keeps working and pushing water into your pipes from the storage tank you likely rely on.
Many of the statistics you can easily look up are misleading, in my opinion. Everybody focuses on the energy factor of the unit, but it's a lot more complicated. The waste heat from a gas appliance goes out the flue. The waste heat from an electric appliance stays in the building, and there's no vent to leak air in and out of your house, so even if you could get a gas unit with the same energy factor, the real impact is different.
Tuesday, April 24, 2012
Mud Room Armoire
We need a piece of storage furniture for the mud room / laundry room entry area. Right now we have a junky old metal shelf, piled with bike gear, swim gear, and other stuff. There's no place to hang jackets or backpacks, or organize all the gear.
After measuring the space and making some quick Sketchup models, this is where I'm at.
 It's a little hard to tell from the perspective, but the front doors are asymmetric. The left door is narrower by a bit. I'm leaning toward the version on the right, with two sets of cupboard doors, and adjustable shelves inside. I envision a hanger rod across on the right side of the upper cupboard, and maybe a stack of adjustable shelving behind the smaller left door. Overall dimensions are about 36" wide, 69" high, and 20" deep. I'm having a hard time choosing the wood. When I drew it I was thinking about walnut for the frames and trim (brown) and alder for the panels (tan).
The next step is to mock it up full size on construction paper. I'll probably tack together a light frame to hold up the paper and really get a feel for how it will sit in the house.
After measuring the space and making some quick Sketchup models, this is where I'm at.

The next step is to mock it up full size on construction paper. I'll probably tack together a light frame to hold up the paper and really get a feel for how it will sit in the house.
Thursday, April 19, 2012
...In Which I Start Woodturning
As my reward for ten weeks of toil on the (soon to be) baby's room, I ordered myself a Delta 46-460 Midi Lathe last week. It came in a few days ago, I picked it up yesterday, hauled it down to the basement last night, and gave it a test drive. The last time I touched a lathe was in about 1985, and I don't think I did anything constructive with it. I intend to use it for tool handles, cabinet pull knobs, and stuff like that. I really didn't want to spend as much as I did, I just wanted a little tiny lathe, but the small ones are all fairly crappy products, made in China, and I couldn't do it.
I did a lot of research and still spent quite a while staring at the tools at Woodcraft trying to decide what I needed to get started. I settled on an Easy Wood Tools carbide-tipped rougher (the mid-size Ci-2), which was expensive but looks like it has an extremely short learning curve, and should last a long time. I also picked up a Sorby 1/8" parting tool and a Sorby 3/8" spindle gouge - without a handle. The gouge was a lot cheaper without the handle, and I figure that will give me something to do right off the bat.
So I made a 7" x 1" blank from a piece of old fir framing scrap. I started with the lathe on it's very slowest setting (like for a 12" log) and took a few hesitant chips with the parting tool. That didn't really work well on the square corners, so I got out the carbide rougher and started making a mess. I attached the dust collector hose to the tool rest post to keep things clean, and slowly turned up the speed as I gained confidence. I managed to make a passable handle for the spindle gouge, using calipers and the parting tool to make a tight fit for a ferrule (a threaded piece of 1/2" brass pipe) and I even got out a 1" bench chisel and used it bevel down and at an angle to give a shearing cut like a skew, which definitely cut very smoothly.
I still need to remove the threads from the brass ferrule and glue in the cutter with some epoxy. Not terrible for a very first effort, I guess. Now I just need to make about 500 more handles and other parts to justify the cost of the tools!
Update: A few days later, and I've made several items. A couple of oak file handles, a much nicer beech handle for the 3/8" spindle gouge, and a handle and knob for a bowsaw that I made. The Easy Wood Tools rougher is quite capable, and I'm glad I bought it, as a total beginner.
I did a lot of research and still spent quite a while staring at the tools at Woodcraft trying to decide what I needed to get started. I settled on an Easy Wood Tools carbide-tipped rougher (the mid-size Ci-2), which was expensive but looks like it has an extremely short learning curve, and should last a long time. I also picked up a Sorby 1/8" parting tool and a Sorby 3/8" spindle gouge - without a handle. The gouge was a lot cheaper without the handle, and I figure that will give me something to do right off the bat.
So I made a 7" x 1" blank from a piece of old fir framing scrap. I started with the lathe on it's very slowest setting (like for a 12" log) and took a few hesitant chips with the parting tool. That didn't really work well on the square corners, so I got out the carbide rougher and started making a mess. I attached the dust collector hose to the tool rest post to keep things clean, and slowly turned up the speed as I gained confidence. I managed to make a passable handle for the spindle gouge, using calipers and the parting tool to make a tight fit for a ferrule (a threaded piece of 1/2" brass pipe) and I even got out a 1" bench chisel and used it bevel down and at an angle to give a shearing cut like a skew, which definitely cut very smoothly.
 |
| Fir Handle for 3/8" Gouge |
Update: A few days later, and I've made several items. A couple of oak file handles, a much nicer beech handle for the 3/8" spindle gouge, and a handle and knob for a bowsaw that I made. The Easy Wood Tools rougher is quite capable, and I'm glad I bought it, as a total beginner.
 |
| I tried to replicate the Sorby handle shape as an exercise, but I need some calipers. My very first sad attempt is at the bottom. |
Thursday, April 12, 2012
Make a Bowsaw
I have a bandsaw. It typically has a 3/4" x 3 tpi resawing blade in it, which is great for making big boards into little boards in a hurry, but not so much for cutting curves. Changing the blade is a ten minute hassle, and for cutting certain items like curved legs or bracket feet that's what I do. But for quick jobs, working on pieces that are too big to take to the bandsaw, or starting in a hole in the middle of a workpiece, an olde timey bowsaw (aka turning saw) is a great tool.
It's basically a big coping saw, using similar narrow blades, but much longer, typically 12". The frame is fairly easy to make from wood, and you can either make your own metal hardware to hold the blades, or buy a set from Tools for Working Wood, who also sell the blades. Bill Anderson is selling a slightly different style of brass pins on his website, too.
Realistically, you can take three sticks and some mason line, drill a few holes, whittle a couple of notches with a knife, insert some hardware, and have a functional saw. You could even take the hardware from a cheap coping saw or make your own from nuts and bolts and make the whole thing really lowbrow. The saw will be much nicer to use, however, if it's shaped carefully to be lightweight while maintaining strength, and comfortable to hold. Plus it's a lot more fun to use beautiful tools, and that goes double when you made it yourself.
There's an episode of the Woodwright's Shop where Roy Underhill and Bill Anderson examine an antique and go through the steps of reproducing it. See that excellent video here. Popular Woodworking did a closely related article with a plan (by Bill Anderson ) in the Nov 2011 issue, and another bowsaw article in Oct 2010. Both of those PWW links have some nice accessory videos and stuff. There's a plan from the 1920's on the "Galootish Gleanings" section of The Cornish Workshop. Tools for Working Wood also has a plan you can print and a page of tips, and Shannon Rogers does a video of his TWW build on his Renaissance Woodworker blog here. Finally, here's another blog entry by Steve Branam.
So there you go. If you visit all those resources, there isn't much I can add, because I don't have any first hand knowledge. I got the Gramercy pins from TWW last week, I'll find some appropriate wood next week, and build my own here soon.

Update: I sliced up some scraps of beech molding on the bandsaw, and made a bowsaw from the straightest-grain sections. I followed TWW's general form and some dimensions, but drew the parts freehand and didn't try to copy their plan slavishly. I reduced the frame components to 9/16" thick before shaping, aiming for a lightweight version. We'll see how it holds up under tension... I also turned a longer handle to fit my hand, with a groove for my thumb near the front. I used 3/32" braided polyester cord for the tensioning mechanism, which doesn't stretch like nylon. I don't know if that matters. I have found that the pins turn a little too easily in their holes, and the saw tends to twist as I use it unless I hold the arm of the saw moreso than the handle. I've found that I either need to wrap my right index finger around the frame, or use both hands, with my left hand on top of my right hand, gripping the frame.

Subscribe to:
Posts (Atom)